The Home Foundry
(Safety Note : Metal casting
is an inherently dangerous activity, with possible injurious or fatal consequences.
Any person who wishes to utilize the information presented here or
in the links must do so at his or her own risk! )
Metal castings are a mainstay of the live steaming hobby, just as
they are in prototype use. They may have a wider use in models,
as castings may be used in boilers and in running gear components which
in prototype practice are forgings or press-formed sheets. The
1" Scale Railroad Supply line includes components which are die-cast,
investment-cast, and sand-cast. Without castings, we'd all be stuck
hogging all our parts out of solid and relatively expensive pieces of metal
stock.
The pressures of global competition, environmental and safety issues,
and the exacting requirements of modern industry has led to the general
decline of the old-time local foundry in most portions of the U.S, particularly
on the west coast. While one can still find foundries which cast
aluminum and bronze, iron foundries have become very scarce. Those
which are still in business are usually using expensive induction furnaces
and are committed to large production runs, with the casting being carried
out by unskilled hands who wouldn't know what to do with a loose pattern.
For the live steam hobbyist who needs a few wheel castings or a couple
cylinder blocks, there's almost no place to go for a limited number of parts,
especially if it involves loose patterns. One can see the effect
of this problem on some commercial hobby suppliers, who are forced to substitute
aluminum castings for parts which should be bronze or iron. My own
frustrating experiences with the industry have led me to explore the possibilities
of pouring my own castings.
Research
The journey began with a trip to the local library. All I found
there was a book by David Gingery, 'The Charcoal Foundry', which is the
first in a series of books collectively titled 'Build a Metalworking Shop
From Scrap' ( for those with piqued interest, there's a few web sites
out there posted by folks who are in pursuit of the 'Gingery Journey').
This book describes in simple terms the methods used to construct
a small crucible furnace out of a 5-gallon bucket and some fire clay.
Mr. Gingery uses charcoal briquets to fire his furnace, and describes
the constuction of the basic accessories needed to melt and pour castings
from aluminum scrap. Although this book does not explore foundrycraft
in depth, it's a great starting point and seems to have been the initial
source of inspiration for many home foundrymen.
The next stop was to check out what's out on the internet. Most
of the home foundry links were hiding within web pages devoted to blacksmithing.
I found quite a number of articles which were helpful (see the
Links
page). The most valuable items I found were discussions on
the construction of various gas burners. Since other folks have
found Mr. Gingery's charcoal fuel and blower arrangement to be somewhat
messy and hazardous ( sparks and carbon monoxide ), I decided then and there
to construct a Gingery-style furnace modified to use a propane burner.
Many foundry furnace burners (including most commercial ones) used
forced air, which makes for somewhat complex construction and operation.
I didn't want a noisy blower to interfere with my hearing, as I use
my ears to tell me if my equipment is working correctly. Happily,
I ran across
Ron Reil's web
page
, which includes plans for a simple bunsen-type burner constructed from
inexpensive pipe fittings. While Ron's original burner was intended
for blacksmith use, Rupert Wenig modified the design by enlarging it into
a 'Monster Burner' and applied it to small-to-medium sized crucible
furnaces. These burners range from about 120,000 BTU to almost 200,000
BTU and are naturally aspriated and do not require a blower.
While perusing all this information, it became clear that I wasn't
going to be melting much iron in a crucible, so I decided to purchase Stewart
Marshall's book on small cupola furnaces. This turned out to be a
very valuable resource for me, for iron foundry furnace construction in
particular, and sand-casting practice in general.
A photo CD which I purchased with the book makes things even
clearer.
Having previously approached some local foundries regarding commercial
work for our product line, I found one in particular to be friendly
enough to lend assistance to my home foundry effort. I was permitted
a visit with their head pattern maker, was shown the process of core making,
and other details of the craft.
Application
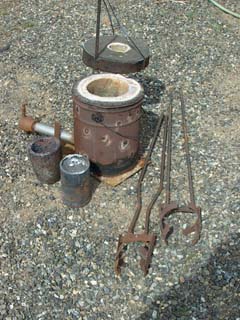
My first furnace was the simple Gingery-style 5-gallon bucket lined
with refractory clay, and the Ron Reil/Rupert Wenig propane burner. I
used an acetylene regulator on the propane tank, as a variable regulator
capable of up to 20 psi is required. I made a couple crucibles from
4" iron pipe with some 3/8" plate welded on the bottom. I fashioned
a pair of crucible tongs to fit these. A couple of wooden flasks
cobbled together from scrap lumber, and I was in business. Using
some water-mix olivine foundry sand obtained commercially, I was able to
melt some aluminum scrap and pour some simple castings with no problems.
When properly adjusted, the burner sounds like a jet engine and will
not flame out once sufficient temperature is attained within the furnace.
Some adjustments to the choke plate are necessary as things heat
up, and the an eye must be kept on the fuel tank to guard against freezing
up and loss of pressure.

This little furnace, though crude, is very handy for small pours and
is the one I use the most. Excluding the regulator, the whole thing
cost me about $100.00 to construct. Someday I'll build another one
that actually looks nice, but I'm in no rush. It will accomodate a
#6 bilge crucible, as well as the homemade steel ones I use for aluminum
and pot metal. It will melt a load of aluminum in about 15 minutes,
and a load of silicon bronze in about 25 minutes. As an experiment,
I attempted to melt a load of cast iron in this furnace. After about
an hour and 5 gallons of propane spent, I managed to liquefy about 10 lbs
of iron, but the temperature peaked out somewhat below the required pouring
temperature and my pour cold shorted in the mold.

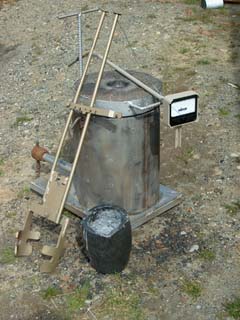
I built a larger crucible furnace which can hold a #16 to #20 crucible.
This one actually looks nice, and uses the same burner I built for
the smaller furnace. I built it strictly for larger aluminum pours.
It would probably work for bronze as well, but I'm not in need of
40-lb bronze castings at present. At this point I purchased an arc
welder to simplify equipment fabrication; my first furnace and crucibles
were gas welded.

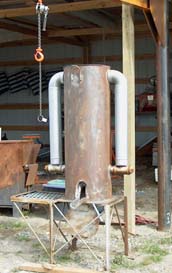
My latest furnace is a 9" bore cupola furnace built using the methods
described by Stewart Marshall. I incorporated some of my own ideas
into the construction of this furnace, not all of which worked out as
intended. The biggest challenge with running a cupola furnace has
turned out to be the scarcity of fuel to fire it. Coal coke
is the best fuel for this purpose, but a determined search proved that
I would have to drive 2000 miles to Utah to obtain it in quantity, or pay
dearly for it to be shipped via UPS from the east. This is a consequence
of the demise of iron foundries on the west coast. I experimented with
making hardwood charcoal, producing about 100 lbs of it in an improvised
brick kiln, but this was a slow and noxious process. Conferring with
Mr. Marshall, he suggested I use regular coal instead. I was able to
obtain a pickup load of fairly decent coal from a supplier who was
only 120 miles away. Use of coal requires some adjustments in the approach,
such as applying propane afterburners to control the smoke problem. As
yet, I have only attempted one test melt using this furnace. It melted
iron very admirably. However, I miscalculated the height of the burning
coal bed, and all my ladles of moulten iron were so cold that all I could
do was pour it off into ingots. I ended up with big chunk of frozen iron
in the ladle and a frozen taphole, so I had to dump the fire then and there.
I'll be back at it when the weather improves this spring; I don't
have a smoke jack set up to allow me to operate it under a roof.
Aside from furnaces, other items of equipment become necessary for
the handling of foundry sand and ramming up molds. I built a molding
bench, powered riddle screen, a variety of flasks, tongs, ingot molds,
a jib crane, and other aids to the process. I've also purchased some
items commercially, such as a pyrometer, and the ever necessary and vital
protective clothing.
Supplies
Aside from fuel for the cupola, the biggest problem for me was obtaining
aluminum and bronze in clean ingots. I didn't wish to melt scrap
of unknown composition for my parts. Most metal dealers work in terms
of tons, not pounds, and the places I tried had a 5-ton minimum purchase.
Fortunately, I found one local foundry to be friendly enough
to sell me some of their inventory. I bought enough bronze and aluminum
to keep me entertained for the next few years. Other supplies are
easier to come by; I found local sources for foundry sand, crucibles, refractory,
flux, and other necessary materials.
The Art of Foundrycraft
Once beyond getting oneself equipped, there's a whole world of topics
such as pattern making, cores and core boxes, fluxes, degassing,
risers and controlling shrinkage, investment casting, and beyond.
Some good articles show up in Live Steam or Modeltec magazine
from time to time which deal with patterns. Some of the advertisers
in these magazines offer how-to books in this area as well. However,
there is much to be learned simply by getting out there and doing it. Not
all your pours will be perfect; you'll probably be happy at first to get
lumps that somewhat resemble the shape of the part you need. If you
don't like it, remelt it and try again. As you encounter a defect
it's not a big deductive leap to arrive at what caused it and through this
you gain insight and improve your techniques.
Caution
While I've found home foundry work to be educational, fun, and enabling,
it is a serious activity which requires good judgement and caution
on the part of the practitioner. As yet I have not suffered any
injury except for hurting my wrist while ramming up molds. Still,
the potential exists for a broken crucible, steam explosion, or other
mishap to occur, and one must be prepared in order to survive such crises.
Investment in the proper protective clothing is a must, including
leather boots with steel toes, leather welding chaps and jacket,
insulated leather gloves, and full face and eye protection. Make sure
that during pours you have a clear working area, and avoid walking backwards
with a load of hot metal. Never pour over a concrete floor, or damp
ground. While most casting alloys are fairly safe when properly
used, one must work in a well-ventilated area avoid breathing any poisonous
fumes from the melt or from fluxes, or from the burner itself. Melting
scrap alloys of uncertain composition may expose one to fumes of lead,
cadmium, arsenic, and other lethal metals. Keep a dry chemical fire
extinguisher and a bucket of dry sand handy in case any spills ignite something.
Check all propane fittings for leaks prior to use, and never run a
furnace unattended -- if the phone rings, shut off the gas.
Freedom
The home foundry has been a very liberating thing for me. Although
I'm a commercial supplier to the hobby, I don't intend to do production
pours here, this is something I leave to my commercial suppliers. Ram
up a few molds yourself and you'll understand why. However,
the development and debugging of new patterns becomes much simpler. Some
new product development has been taking place here ( to be revealed in
due time ), and I've cast a variety of items for use on my personal model
projects. Gone forever is the humiliation of being laughed out of
a foundry office when you show them the loose pattern you worked so hard
to make.


